送的礼物,当然要好好折腾折腾
引言
树莓派到如今已经发布了4代,性能自然是越来越强了,每一代都分为A、B型,也有比较特殊的型号比如去掉大部分接口很小巧的树莓派Zero、去掉所有接口的树莓派计算型CM(Compute Module)、B型的增强型B+等。其中B型是最常用的,而A、B型区别也只在于尺寸和接口不同,SoC基本都是一致的。
设备
- MacBook Pro (14-inch, 2021)
- Raspberry Pi Model B (4GB)
硬件
主要接口
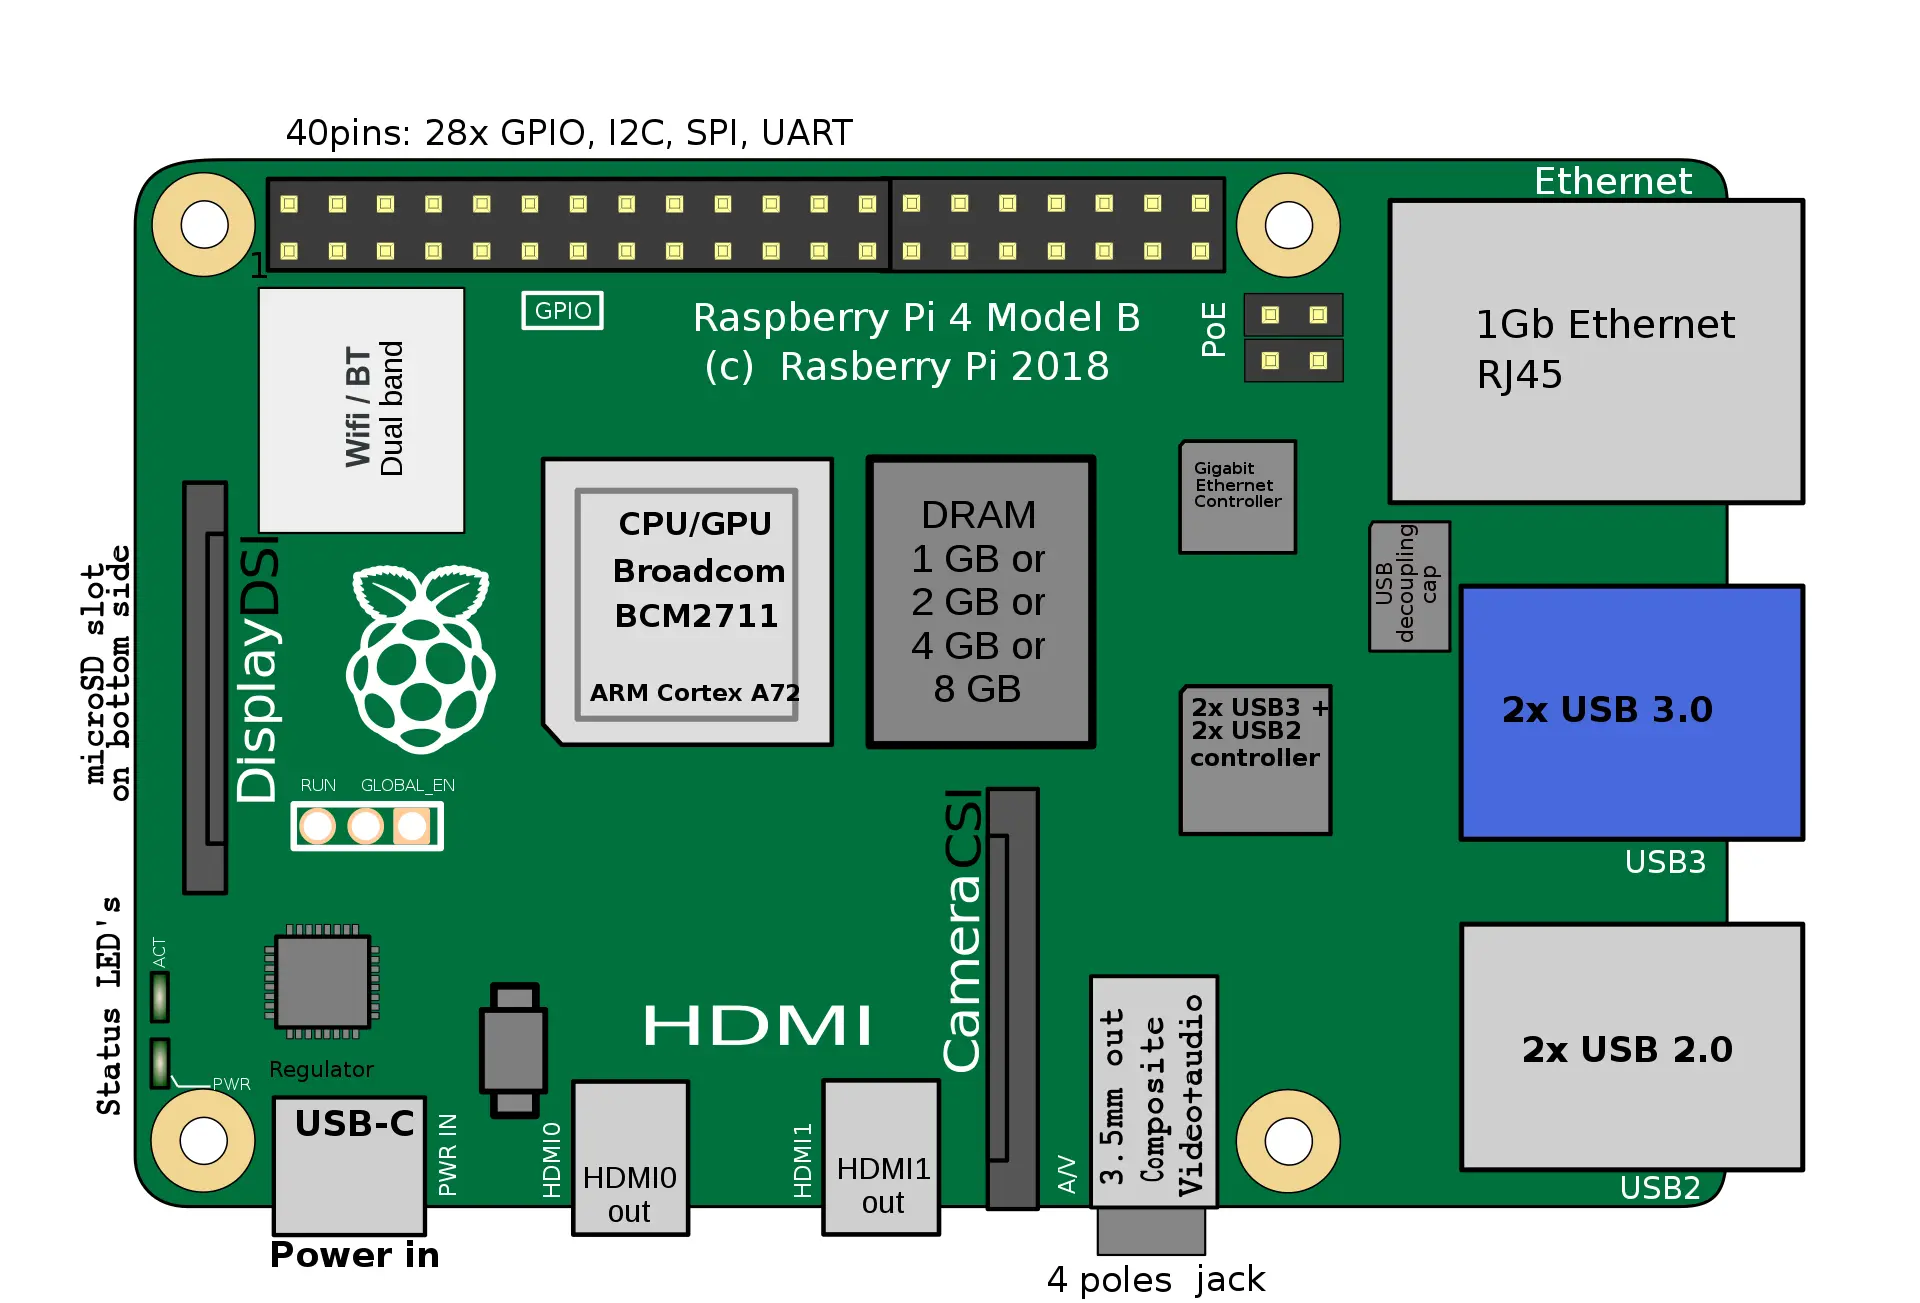
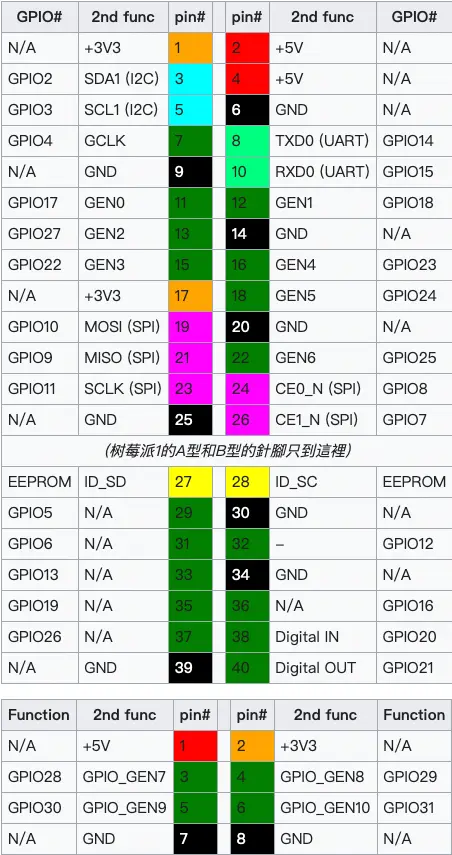
GPIO 引脚
散热器
风扇的接线是接载树莓派最外排是从右往左数第二和第三个引脚上,红色接第二根引脚(+5V),黑色接第三根引脚(GND)。

搭建系统
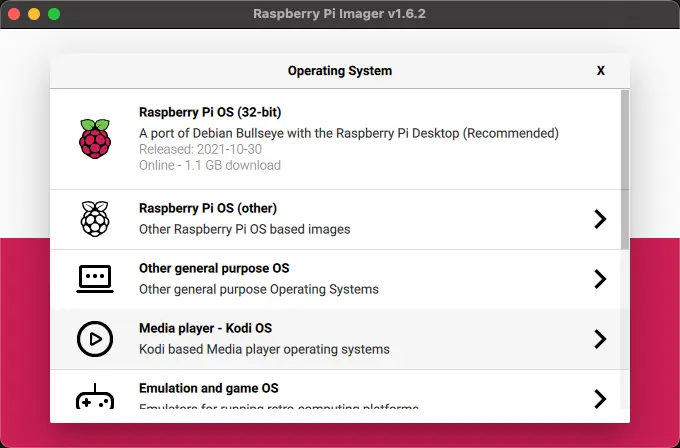
树莓派开发板没有配置板载 FLASH,它支持 SD 卡启动(或者从U盘启动),所以我们需要下载相应镜像,并将其烧写在 SD 上制作系统盘。
支持的系统如下: Raspbian、Arch Linux ARM、Debian Squeeze、Firefox OS、Gentoo Linux、Google Chrome OS、Raspberry Pi Fedora Remix、Slackware ARM、QtonPi、Slackware ARM、WebOS、RISC OS、FreeBSD、NetBSD、Android 4.0(Ice Cream Sandwich)
下载镜像
https://www.raspberrypi.com/software/operating-systems/
建议 NOOBS 安装。Mac用户直接可以跳过。
镜像烧写
准备工作
- TF卡(2GB以上)
- 读卡器
- Raspberry Pi Imager(Mac烧录工具)
Tips
- 4b没有标准HDMI接口,只有micro HDMI接口
- 建议准备一根网线,直连在路由器上,这样方便获得树莓派ip地址
- 默认树莓派没有开启ssh,vnc服务,所以在无法连接显示屏的情况下,建议下载已经修改过设置的镜像
树莓派访问方式
外接 HDMI 或者 AV 显示器,USB 鼠标、键盘
- 初次连接使用
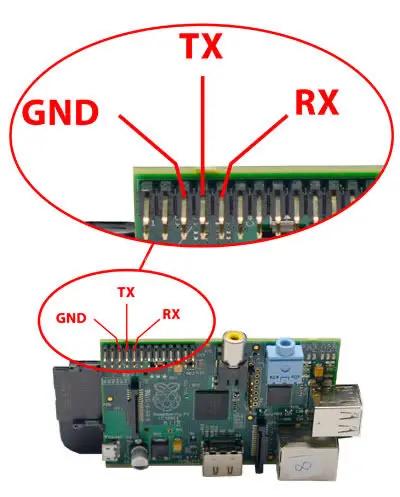
使用 USB 转 TTL 串口模块通过串口访问树莓派
SSH
- username: pi
- password: raspberry
VNC
运营商普遍屏蔽了5900这个端口,注意转发
树莓派配置
经过前面的步骤,树莓派已经可以正常工作了,但在正式开发使用之前,还需要做一些配置。
树莓派第一次使用的时候需要进行一个简单的配置,在命令行模式下运行以下命令:
| |

- System Options
- Wireless LAN 无线设置
- Password 修改密码
- Interface Options
- SSH 开启SSH
- VNC 开启VNC
- Localisation Options
- Lacale 建议英文
- Timezone 初始为英国,这里改成 Shanghai/Hong Kong
- Overclock 超频选项,新手不建议调整
树莓派网络与更新配置
有线网络
- 自动获取 IP:树莓派默认有线网卡是使能的,只需将网线插入树莓派网卡,即可自动获得 IP(要求在局域网内)。
- 手动设定 IP:如果是电脑与树莓派直连,不能自动获得 IP,可以使用:ifconfig eth0 192.168.1.123 设定 ip(下次重启就没了)。
- 设置静态 IP:如果担心在同网络情况下 ip 或者不固定,可以讲电脑设置为静态 ip
- 打开文件
/etc/dhcpcd.conf - 修改
# Example static IP configuration下面的配置
- 打开文件
无线网络
4b带有WiFi模块,所以可以直接跳过。
更新软件源
Linux的软件不像Windows,基本都是需要在线安装的,但是树莓派由于各种原因其默认的软件源在国内速度并不是很理想,所以需要更新一下软件源。
软件更新源
1sudo vi /etc/apt/sources.list系统更新源
1sudo vi /etc/apt/sources.list.d/raspi.list
这里我们使用 清华源 ,根据自己机器操作系统的版本修改文件内容。
查看系统版本
1lsb_release -a1 2 3 4 5No LSB modules are available. Distributor ID: Raspbian Description: Raspbian GNU/Linux 10 (buster) Release: 10 Codename: buster
挂载
使用fdisk命令查看设备硬盘情况
1sudo fdisk -l使用
df查看挂载情况1df -h
手动挂载
在
/mnt下新建一个目录作为挂载点1sudo mkdir /mnt/udisk挂载
1sudo mount -o uid=pi,gid=pi /dev/sda1 /mnt/udisk卸载
1sudo umount /mnt/1GB_USB_flash
Tips
- sda1 是取决于你的实际情况,a 表示第一个硬盘,1 表示第一个分区。
- FAT 格式 U 盘 mount 本身就能支持,但如果你的 U 盘或移动硬盘使用的是 exFAT 格式,mount 会说不支持。 安装 exfat-fuse 软件之后 mount 就支持了。
sudo apt-get install exfat-fuse
开机挂载
在
/etc/fstab中新增一行,每次开机都会挂载1/dev/sda1 /mnt/udisk vfat rw,defaults 0 0
热插挂载
需要希望想电脑一样,插上自动识别挂载在某一目录下,拔下自动 umount,按以下操作,会自动在 /mnt/udisk 目录下挂载 U 盘。
新建文件
1sudo vi /etc/udev/rules.d/10-usbstorage.rules输入
1 2 3 4 5 6 7 8 9 10 11 12 13 14 15 16 17KERNEL!="sd*", GOTO="media_by_label_auto_mount_end" SUBSYSTEM!="block",GOTO="media_by_label_auto_mount_end" IMPORT{program}="/sbin/blkid -o udev -p %N" ENV{ID_FS_TYPE}=="", GOTO="media_by_label_auto_mount_end" ENV{ID_FS_LABEL}!="", ENV{dir_name}="%E{ID_FS_LABEL}" ENV{ID_FS_LABEL}=="", ENV{dir_name}="Untitled-%k" ACTION=="add", ENV{mount_options}="relatime,sync" ACTION=="add", ENV{ID_FS_TYPE}=="vfat", ENV{mount_options}="iocharset=utf8,umaskk =000" ACTION=="add", ENV{ID_FS_TYPE}=="ntfs", ENV{mount_options}="iocharset=utf8,umaskk =000" ACTION=="add", RUN+="/bin/mkdir -p /mnt/udisk/", RUN+="/bin/mount -o $env{mount__ options} /dev/%k /mnt/udisk/" ACTION=="remove", ENV{dir_name}!="", RUN+="/bin/umount -l /mnt/udisk/}", RUN+="// bin/rmdir /mnt/udisk/" LABEL="media_by_label_auto_mount_end"4b上不需要这个功能,默认挂在
/media/pi/<udisk_name>
墨水屏
| |
软件
统计端口
| application | local port | url |
|---|---|---|
| smb | 139,445 | |
| mysql | 3306 | |
| calendar | 5000 | calendar.pi.eveneko.com:9000 |
| vnc | 5900 | pi.eveneko.com:5901 |
| pihole_web | 8488 | |
| clash_web | 8588 | clash.pi.eveneko.com:9000 |
| clash | 7890,9090 | |
| nextcloud | 8688 | |
| aria2 | 6800 | |
| ariaNg | 8788 | aria2.pi.eveneko.com:9000 |
| frp dashboard | 7500 | pi.eveneko.com:7500 |
| jupyter | 8888 | jupyter.pi.eveneko.com:9000 |
| portainer | 8988 | portainer.pi.eveneko.com:9000 |
中文
安装中文字库
1sudo apt-get install ttf-wqy-zenhei安装中文输入法
1sudo apt-get install fcitx fcitx-googlepinyin fcitx-module-cloudpinyin fcitx-sunpinyin
python3
默认使用python3
1 2sudo rm /usr/bin/python sudo ln -s /usr/bin/python3.7 /usr/bin/python换源
临时使用
1pip install -i https://pypi.tuna.tsinghua.edu.cn/simple some-package设为默认
1 2pip3 config set global.index-url https://pypi.tuna.tsinghua.edu.cn/simple pip3 install pip -U
nginx
安装
1sudo apt-get install nginx其他命令
1 2 3 4 5 6# 启动 nginx systemctl start nginx # 停止 systemctl stop nginx # 加载配置文件 systemctl reload nginx启动
1systemctl enable nginx
jupyterlab
安装
1pip3 install jupyter配置
1python3 -m jupyter notebook --generate-config修改以下内容
1 2 3 4 5 6 7 8c.NotebookApp.allow_origin = '*' c.NotebookApp.ip = '0.0.0.0' c.NotebookApp.open_browser = False c.NotebookApp.port = 8888 c.NotebookApp.notebook_dir = '</home/pi>' c.NotebookApp.allow_root = True c.NotebookApp.allow_remote_access = True c.NotebookApp.token = ''开机自启动
在
/etc/init.d下新建文件jupyter.init1 2 3 4 5 6 7 8 9 10 11 12 13 14 15 16 17 18 19 20 21 22 23 24 25#!/bin/bash ### BEGIN INIT INFO # Provides: jupyter # Required-Start: $local_fs $remote_fs $network $syslog # Required-Stop: $local_fs $remote_fs $network $syslog # Default-Start: 2 3 4 5 # Default-Stop: 0 1 6 # Short-Description: jupyter service # Description: jupyter service daemon ### END INIT INFO case "$1" in start) echo "starting jupyterlab" su pi -c "nohub python3 -m jupyterlab > /dev/null 2>&1 &" ;; stop) echo "stopping jupyterlab" kill $(ps aux|grep -m 1 'python3 -m jupyterlab'|awk '{ print $2}') ;; *) echo "Usage: service jupyterlab start|stop" exit 1 ;; esac exit 0添加权限
1sudo chmod +x /etc/init.d/jupyter.init设置开机启动
1sudo update-rc.d jupyter.init defaults重启
rcconf查看启动项开机启动目前用supervisor实现,还可以守护进程。
frp内网穿透
frp 是一个高性能的反向代理应用,可以帮助您轻松地进行内网穿透,对外网提供服务,支持 tcp, http, https 等协议类型,并且 web 服务支持根据域名进行路由转发。
在 frp releases 下载对应版本的frp
下载后,对应修改 frps.ini
服务端
1 2 3 4 5 6 7 8 9[common] bbind_port = 7000 privilege_token = eveneko max_pool_count = 5 dashboard_port = 7500 dashboard_user = admin dashboard_pwd = admin vhost_http_port = 9000 #subdomain_host = pi.eveneko.com后台启动
1nohup ./frps -c frps.ini>/dev/null 2>&1 &在
/etc/init.d下新建文件frps.init1 2 3 4 5 6 7 8 9 10 11 12 13 14 15 16 17 18 19 20 21 22 23 24 25#!/bin/bash ### BEGIN INIT INFO # Provides: frp # Required-Start: $local_fs $remote_fs $network $syslog # Required-Stop: $local_fs $remote_fs $network $syslog # Default-Start: 2 3 4 5 # Default-Stop: 0 1 6 # Short-Description: frps service # Description: frps service daemon ### END INIT INFO case "$1" in start) echo "starting frps" nohup /home/ubuntu/Workspace/frp/frps -c /home/ubuntu/Workspace/frp/frps.ini>/dev/null 2>&1 & ;; stop) echo "stopping frps" kill $(ps aux|grep -m 1 '/home/ubuntu/Workspace/frp/frps -c /home/ubuntu/Workspace/frp/frps.ini'|awk '{ print $2}') ;; *) echo "Usage: service frps start|stop" exit 1 ;; esac exit 0开机启动目前用supervisor实现,还可以守护进程。
客户端
1 2 3 4 5 6 7 8 9 10 11 12 13 14 15 16 17 18 19 20 21 22 23 24 25 26 27 28 29 30 31 32 33 34 35 36 37 38 39 40 41 42 43 44 45 46 47 48[common] server_addr = pi.eveneko.com server_port = 7000 privilege_token = eveneko [ssh] type = tcp local_ip = 127.0.0.1 local_port = 22 remote_port = 2222 [pi-vnc] type = tcp local_ip = 127.0.0.1 local_port = 5900 remote_port = 5901 [pi-jupyter] type = http local_port = 8888 custom_domains = jupyter.pi.eveneko.com #subdomain = jupyter [pi-ariaNg] type = http local_port = 8788 custom_domains = aria2.pi.eveneko.com [pi-aria2] type = tcp local_ip = 127.0.0.1 local_port = 6800 remote_port = 6800 [pi-portainer] type = http local_port = 8988 custom_domains = portainer.pi.eveneko.com [pi-clash] type = http local_port = 8588 custom_domains = clash.pi.eveneko.com [pi-calendar] type = http local_port = 5000 custom_domains = calendar.pi.eveneko.com后台启动
1nohup ./frpc -c frpc.ini>/dev/null 2>&1 &在
/etc/init.d下新建文件frpc.init1 2 3 4 5 6 7 8 9 10 11 12 13 14 15 16 17 18 19 20 21 22 23 24 25#!/bin/bash ### BEGIN INIT INFO # Provides: frp # Required-Start: $local_fs $remote_fs $network $syslog # Required-Stop: $local_fs $remote_fs $network $syslog # Default-Start: 2 3 4 5 # Default-Stop: 0 1 6 # Short-Description: frpc service # Description: frpc service daemon ### END INIT INFO case "$1" in start) echo "starting frpc" nohup /home/pi/Workspace/frp/frpc -c /home/pi/Workspace/frp/frpc.ini>/dev/null 2>&1 & ;; stop) echo "stopping frpc" kill $(ps aux|grep -m 1 '/home/pi/Workspace/frp/frpc -c /home/pi/Workspace/frp/frpc.ini'|awk '{ print $2}') ;; *) echo "Usage: service frpc start|stop" exit 1 ;; esac exit 0开机启动目前用supervisor实现,还可以守护进程。
supervisor
帮助我们守护进程,自动恢复服务
安装
1sudo apt-get install supervisor配置
1 2 3 4 5 6 7 8 9 10 11 12 13 14 15[program:frpc] directory = /home/pi/Workspace/frp/ ; command = /home/pi/Workspace/frp/frpc -c /home/pi/Workspace/frp/frpc.ini ; root = pi ; stopsignal = INT ; autostart = true ; startsecs = 5 ; autorestart = true ; startretries = 10 ; stopasgroup = true ; killasgroup = true ; redirect_stderr = true ; stdout_logfile_maxbytes = 20MB ; stdout_logfile_backups = 20 ; stdout_logfile = /var/log/frpc.log ;1 2 3 4 5 6 7 8 9 10 11 12 13 14 15[program:jupyterlab] directory = /home/pi/ ; command = python3 -m jupyterlab ; user = pi ; stopsignal = INT ; autostart = true ; startsecs = 10 ; autorestart = true ; startretries = 10 ; stopasgroup = true ; killasgroup = true ; redirect_stderr = true ; stdout_logfile_maxbytes = 20MB ; stdout_logfile_backups = 20 ; stdout_logfile = /var/log/jupyterlab.log ;1 2 3 4 5 6 7 8 9 10 11 12 13 14 15 16[program:ncovbot] directory = /home/pi/Workspace/BUPT-NCOV-AUTO-REPORT-BOT/ ; command = /home/pi/Workspace/BUPT-NCOV-AUTO-REPORT-BOT/venv/bin/python3 ./main.py ; environment=http_proxy="http://localhost:7890",https_proxy="http://localhost:7890" user = pi ; stopsignal = INT ; autostart = true ; startsecs = 5 ; autorestart = true ; startretries = 10 ; stopasgroup = true ; killasgroup = true ; redirect_stderr = true ; stdout_logfile_maxbytes = 20MB ; stdout_logfile_backups = 20 ; stdout_logfile = /var/log/ncovbot.log ;注意 supervisor 的环境变量需要
重新加载配置
1sudo supervisorctl reload查看状态
1sudo supervisorctl status注意user是root到时候,可能会出现一下环境问题
docker
docker
1sudo curl -sSL https://get.docker.com | sh换源
1sudo vim /etc/docker/daemon.json1 2 3{ "registry-mirrors": ["https://registry.docker-cn.com"] }docker-compose
Docker Compose 的安装方式有很多种,但由于 ARM 架构的限制,树莓派上的 Docker Compose 建议使用 pip 安装。
1sudo pip3 install -U docker-composeui
| |
默认用户admin
Aria2
Aria2 是一款自由、跨平台命令行界面的下载管理器,和 wget 这类下载器不同的是,Aria2 不仅支持 BitTorrent,还能够从各种来源多路检索所请求的文件。包括 HTTP,HTTPS,FTP 和 BitTorrent 协议。
而且 Raspbain 系统默认已经安装了 Aria2,运行 apt-cache show aria2 即可查看安装信息。
| |
默认用户/密码 admin/admin
mysql
为Nextcloud准备
| |
Nextcloud
Nextcloud是一款开源免费的私有云存储网盘项目,可以让你快速便捷地搭建一套属于自己或团队的云同步网盘,从而实现跨平台跨设备文件同步、共享、版本控制、团队协作等功能。它的客户端覆盖了Windows、Mac、Android、iOS、Linux 等各种平台,也提供了网页端以及 WebDAV接口,所以你几乎可以在各种设备上方便地访问你的云盘。
| |
–link 链接数据库容器,链接使用mysql容器镜像mysql(容器名称), 不使用则为sqlite数据库 -v 挂载目录,将容器
/var/www/html挂载到主机/mnt/sde/nextcloud下面,html为服务路径,稍后会修改/mnt/sde/nextcloud/config/config.php的data,修改data的目录
docker-compose.yml
| |
等一块硬盘盒
smb
| |
clash
科学上网,dddd
docker-compose.yaml1 2 3 4 5 6 7 8 9 10 11 12 13 14 15 16 17 18 19 20 21 22 23 24 25 26 27 28 29 30 31 32version: '3' services: clash: # ghcr.io/dreamacro/clash # ghcr.io/dreamacro/clash-premium # dreamacro/clash # dreamacro/clash-premium image: dreamacro/clash container_name: clash volumes: - ./config.yaml:/root/.config/clash/config.yaml # - ./ui:/ui # dashboard volume ports: - "7890:7890" - "7891:7891" - "9090:9090" # - "8080:8080" # external controller (Restful API) # # TUN # cap_add: # - NET_ADMIN # devices: # - /dev/net/tun restart: unless-stopped #network_mode: "bridge" # or "host" on Linux clash_web: image: haishanh/yacd restart: always depends_on: - clash ports: - 8588:80 container_name: clash_web创建
config.yaml后,执行1sudo docker-compose up -d查看log
1sudo docker-compose logs停止clash
1docker-compose stop测试
1curl -x 127.0.0.1:7890 http://www.google.com设置代理
1 2 3 4 5 6 7 8 9 10 11 12 13 14# Define `setproxy` command to enable proxy configuration setproxy() { export http_proxy="http://localhost:7890" export https_proxy="http://localhost:7890" } # Define `unsetproxy` command to disable proxy configuration unsetproxy() { unset http_proxy unset https_proxy } # By default, enable proxy configuration for terminal login setproxy
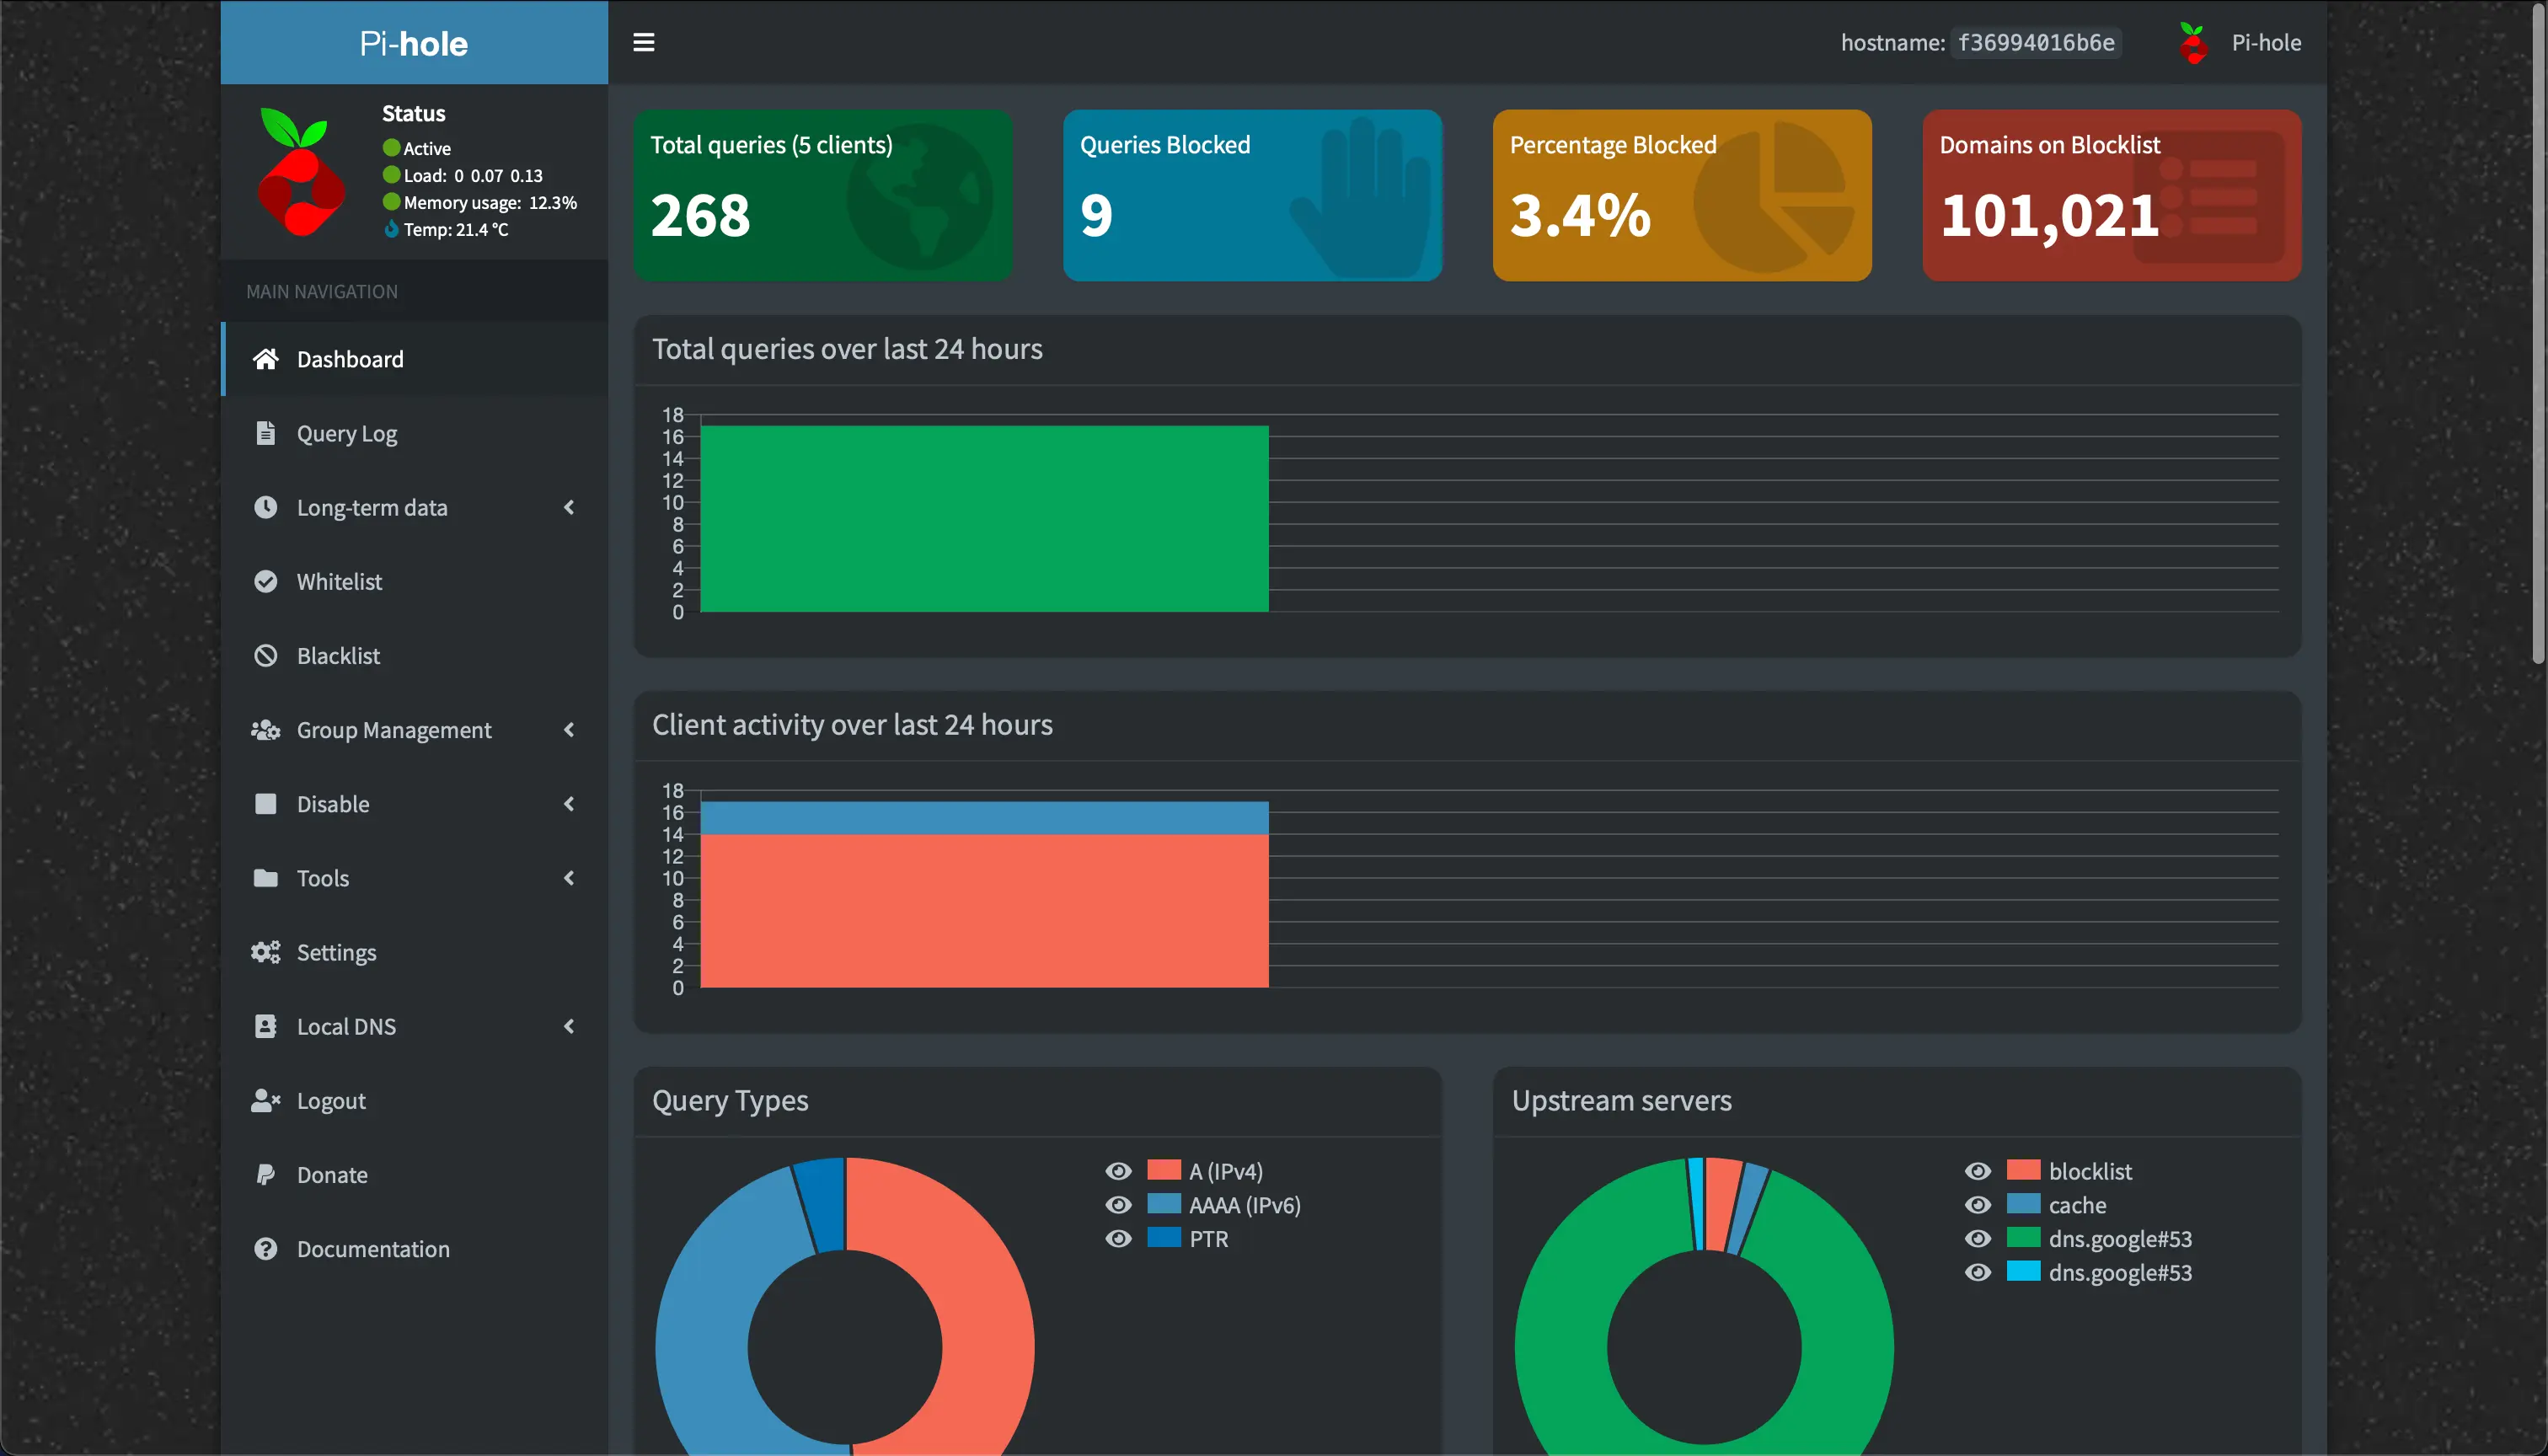
pihole
Pi-hole 是一款开源且免费的 DNS 沉洞服务器(DNS sinkhole)
docker-compose.yaml1 2 3 4 5 6 7 8 9 10 11 12 13 14 15 16 17 18 19 20 21 22 23version: "3" # More info at https://github.com/pi-hole/docker-pi-hole/ and https://docs.pi-hole.net/ services: pihole: container_name: pihole image: pihole/pihole:latest ports: - "53:53/tcp" - "53:53/udp" #- "67:67/udp" # Only required if you are using Pi-hole as your DHCP server - "8488:80/tcp" environment: TZ: 'America/Chicago' # WEBPASSWORD: 'set a secure password here or it will be random' # Volumes store your data between container upgrades volumes: - './etc-pihole:/etc/pihole' - './etc-dnsmasq.d:/etc/dnsmasq.d' # https://github.com/pi-hole/docker-pi-hole#note-on-capabilities cap_add: - NET_ADMIN # Recommended but not required (DHCP needs NET_ADMIN) restart: unless-stoppedweb
http://<ip>:<port>/admin
ad host
国内广告屏蔽不够全面 设备有时候不自动更换dns